CNC Bead Blasting & Type II Sulfuric Anodizing: Benefits, Process & Applications
Surface finishing is often treated as an afterthought in CNC part design, yet it directly affects corrosion resistance, wear performance, cosmetic quality, and even fatigue life. Two of the most widely specified finishes for machined aluminium and stainless steel components are bead blasting and Type II sulfuric anodizing, often used together to produce a consistent, uniform, satin-anodized surface. This guide breaks down how each process works, how they interact, and how to specify them correctly on your next CNC drawing.
What Is Bead Blasting in CNC Machining?
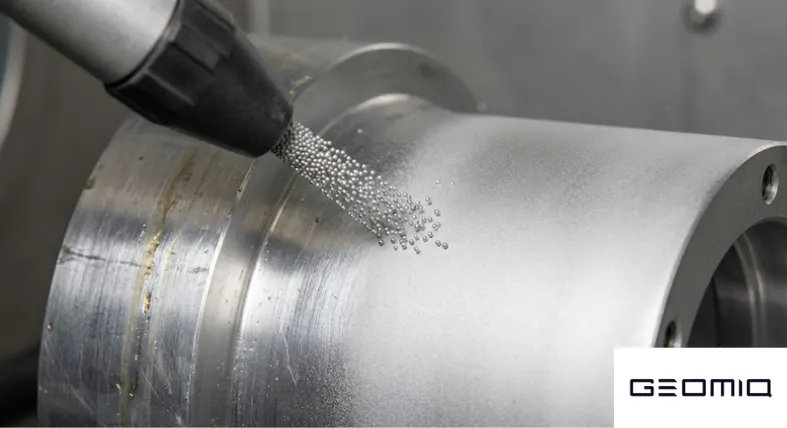
Bead blasting is a cold, mechanical surface treatment in which fine spherical media, most commonly glass beads, are propelled at a machined surface using compressed air. Unlike cutting or grinding operations, the process removes no appreciable stock; instead, it work-hardens and texturises the outermost layer of the material. The result is a uniform matte or satin appearance that hides tool marks, witness lines, and minor surface inconsistencies left behind by milling or turning operations, and it's one of the more reliable ways to control bead blasting surface roughness on a finished component.
Because the media is round rather than angular, glass bead blasting produces a peening effect rather than a cutting effect. Each impact leaves a microscopic dimple instead of a scratch, and as thousands of these dimples accumulate across the surface, they scatter light evenly. This is what gives bead-blasted CNC parts their characteristic soft, non-reflective sheen, a finish that's become a de facto standard for enclosures, brackets, and consumer-facing hardware manufactured through CNC machining services.
The Bead Blasting Process
How Does the CNC Bead Blasting Process Work?
In a production environment, bead blasting is carried out inside an enclosed cabinet fitted with a bead blasting machine that recirculates media through either a suction-feed (siphon) or pressure-feed system. Pressure-feed systems accelerate the beads to higher velocities and are generally preferred for harder alloys or thicker sections, while suction-feed systems offer finer control for delicate or thin-walled geometries. Operators manipulate the part by hand or via a rotating fixture to ensure blast coverage is even across every face, including internal pockets and radii.
Several variables determine the final result:
- Media size and grade։ typically specified as coarse, medium, fine, or very fine, corresponding to standardised mesh/grit ranges
- Blast pressure։ usually 20–90 psi depending on media type and substrate hardness
- Standoff distance and dwell time։ how close the nozzle sits to the part and how long each area is exposed
- Nozzle angle։ blasting at 45–90° affects both coverage and peening intensity
Getting these parameters right is what separates a genuinely uniform bead blast finish from one with visible streaking or inconsistent Ra values across a part's surfaces.
Bead Blasting Media Types Compared
Media selection is the single biggest factor influencing both the cosmetic result and the mechanical effect of blasting. Glass bead is the default for most CNC applications because it's chemically inert, contains no free silica, and won't discolour the substrate, but it isn't always the right choice, particularly when a part also needs to be prepared for a subsequent coating like anodizing where surface etching is a factor to consider. The table below compares the media types most relevant to machined metal components, including their suitability for use with aluminium in CNC machining.
| Media Type | Shape | Mohs Hardness | Typical Effect | Material Removal | Best Suited For |
|---|---|---|---|---|---|
| Glass bead | Spherical | 5.5 | Satin/matte peening finish | Very low | Aluminium, stainless steel, general cosmetic finishing |
| Ceramic shot | Spherical | ~7 | Aggressive peening, controlled finish | Very low | Hardened steels, fatigue-critical aerospace parts |
| Steel shot | Spherical | 6–7.5 | Heavy-duty peening, stress relief | Very low | Cast iron, tool steel, de-rusting |
| Aluminium oxide | Angular | 8–9 | Etched matte finish, faster cutting | Medium-high | Pre-anodize etching, paint preparation |
| Plastic media (Urea) | Angular | 3–4 | Gentle cleaning, no dimpling | Very low | Delicate parts, deflashing, light coating removal |
For most CNC-machined aluminium enclosures and brackets, fine-grade glass bead at 30–50 psi remains the industry benchmark, delivering a consistent satin texture without affecting dimensional tolerances.
Bead Blasting by Material: Aluminium, Stainless Steel & Alloy Wheels
Not every alloy responds to blasting in the same way, and the correct media, pressure, and dwell time will vary significantly depending on what's coming off the machine. This is also where the question of bead blasting vs anodizing as separate or combined steps first comes up, since the finishing sequence depends heavily on the base material.
Bead Blasting Aluminium
Aluminium is the most common substrate for bead blasting in CNC work, largely because it's also the most common material anodized afterwards. Glass bead blasting aluminium at moderate pressure produces an even, low-reflectivity surface that masks tooling marks from CNC milling services while leaving the part ready for anodizing or passivation. Bead blasting aluminium before anodizing is the standard sequence, and because aluminium is relatively soft, over-aggressive media or excessive dwell time can round sharp edges or distort thin walls, so pressure is typically kept toward the lower end of the range (20–40 psi) for precision components.
Bead Blast Finish on Stainless Steel
Stainless steel is considerably harder and more abrasion-resistant than aluminium, so achieving a consistent bead blast finish on stainless steel generally requires higher pressures and, in some cases, harder media such as ceramic or steel shot. The resulting surface has excellent corrosion resistance on its own, stainless steel doesn't require a supplementary coating the way aluminium does, but blasting is still specified heavily for medical, food-grade, and architectural components where a uniform, low-glare surface is a functional requirement rather than just a cosmetic one.
Alloy Wheel Bead Blasting
Bead blasting alloy wheels sits slightly outside core CNC machining but shares the same fundamentals: media strips old coatings, corrosion, and surface contamination without removing significant base material, restoring the wheel to a clean substrate ready for repainting, powder coating, or diamond cutting. Alloy wheel bead blasting typically uses coarser media and higher pressures than precision CNC components since the priority is fast, thorough stripping rather than tight surface roughness control.
Bead Blasting vs Sand Blasting: Which Should You Specify?
Bead blasting and sand blasting are frequently confused, but they produce fundamentally different results because of the shape of the media involved. Sand blasting , and its modern substitutes like aluminium oxide grit , uses angular particles that cut and etch the surface, making it far more aggressive and better suited to stripping heavy coatings or preparing a surface for paint adhesion. Bead blasting, by contrast, peens rather than cuts, which preserves dimensional accuracy but does little to key a surface for subsequent coatings.
| Factor | Bead Blasting | Sand Blasting |
|---|---|---|
| Media shape | Spherical | Angular |
| Surface effect | Peening (dimples) | Cutting/etching |
| Typical finish | Satin, uniform, low-glare | Duller, rougher, textured |
| Dimensional impact | Minimal | Can affect tight tolerances |
| Paint/coating adhesion | Poor to moderate | Excellent |
| Coating/rust stripping speed | Slow | Fast |
| Health/safety considerations | No free silica (glass bead) | Silica dust hazard with sand media |
For CNC parts with toleranced features, bead blasting is almost always the safer specification. Sand or grit blasting is reserved for parts that will be painted, powder coated, or need aggressive decontamination before further processing.
What Is Type II Sulfuric Anodizing?
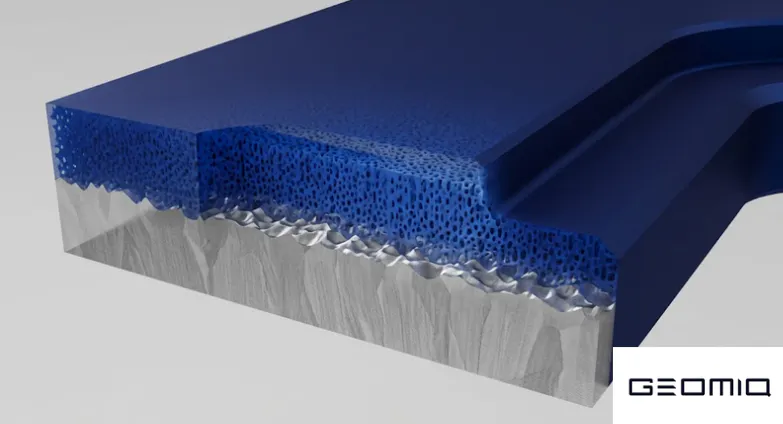
Sulfuric anodizing, formally Type II anodizing under MIL-A-8625 / MIL-PRF-8625, and closely aligned with BS EN ISO 10074 in the UK, is an electrochemical process that converts the outer surface of an aluminium part into a dense, adherent layer of aluminium oxide. Unlike a coating that's applied on top of the part, the anodic layer grows out of the base metal itself, which is why anodized aluminium retains its dimensional profile far more predictably than plated or painted alternatives. For a broader look at how anodizing fits alongside other finishing options, our CNC machining guide covers the full range of post-processing treatments available for machined parts.
The Type II designation specifically refers to conventional sulfuric acid anodizing, which produces a coating typically between 5 and 25 microns thick, a Type II anodizing thickness that's thinner and more decorative than Type III hardcoat anodizing, but with excellent corrosion resistance, good electrical insulation, and a porous structure that readily accepts dye for colour finishing. Understanding Type II vs Type III anodizing thickness is often the first thing engineers need to clarify when specifying a finish, since the two serve very different functional purposes. Getting the right result also depends on dialing in the correct sulfuric anodizing process parameters, bath temperature, current density, and time all affect the final coating consistency. It's the default anodizing specification for the vast majority of commercial and industrial aluminium components produced through CNC machining.
The Type II Sulfuric Acid Anodizing Process Step by Step
Sulfuric acid anodize processing follows a tightly controlled sequence, and deviation at any stage can compromise coating uniformity, colour consistency, or corrosion performance. A typical production line specified for CNC machining services runs through the following stages:
- Cleaning and degreasing։ removes cutting fluids, oils, and handling residue left over from machining
- Alkaline or acid etching։ produces a uniform micro-texture and removes the natural oxide layer
- Desmutting։ neutralises smut left behind by etching, typically in a nitric or mixed-acid bath
- Anodizing։ the part is immersed in a sulfuric acid electrolyte (typically 15–20% concentration) at 18–24°C and subjected to DC current at roughly 12–20V, building an oxide layer at a controlled rate
- Dyeing (optional)։ the porous oxide structure absorbs organic or inorganic dye while still open
- Sealing։ hot water, nickel acetate, or mid-temperature sealing closes the pores, locking in colour and maximising corrosion resistance
Current density during the anodizing stage is usually held around 1.2–1.5 A/dm², since higher densities generate excess heat that can lead to "burning" , localised soft, powdery patches in the oxide layer. Tight temperature control throughout the bath is arguably the single most important variable for producing a consistent, defect-free finish across a production batch.
Type II vs Type III Hardcoat Anodizing
Engineers frequently need to choose between conventional sulfuric anodizing and hardcoat (Type III) anodizing, and the decision comes down to whether the application prioritises appearance and general corrosion resistance or wear performance under mechanical load.
| Parameter | Type II (Sulfuric) | Type III (Hardcoat) |
|---|---|---|
| Electrolyte concentration | ~15–20% sulfuric acid | ~10–15% sulfuric acid |
| Bath temperature | 18–24°C | 0–10°C |
| Typical coating thickness | 5–25 microns | 25–100 microns |
| Surface hardness | ~250–350 HV | ~400–600 HV |
| Appearance | Can be dyed a wide range of colours | Grey to dark grey/black, limited dyeing |
| Dimensional buildup | Minimal | Significant — must be accounted for in tolerancing |
| Typical applications | Enclosures, brackets, cosmetic parts | Bushings, wear surfaces, hydraulic components |
Combining Bead Blasting and Sulfuric Anodizing for a Uniform Finish
Anodized Finish and Structure
Bead blasting and sulfuric anodizing are frequently specified together, and the sequencing matters. Bead blasting before anodizing is almost always the correct order, never after, since the anodic layer is thin, hard, and brittle, subjecting it to abrasive media would crack or strip the finish rather than texture it. Pre-anodize bead blasting instead gives the porous oxide layer a uniform substrate to grow on, which is what produces the even, low-glare bead blast anodize finish so common on enclosures and housings, and what most engineers picture when they think of bead blasted anodized aluminium.
This combination is particularly valuable in rapid manufacturing environments where multiple parts from a single production batch need to look and perform identically. A consistent bead-blasted surface before anodizing minimises visible variation in colour depth and sheen across a batch, a common complaint when parts are anodized straight from the machine with visible tool marks still present. It's worth noting that masking is critical at this stage: any surfaces requiring tight tolerances, threaded features, or electrical contact points should be protected from both the blast media and the anodizing bath. Knowing how to specify bead blast anodize on drawing callouts, including surface roughness targets, masked areas, and anodize class, helps avoid ambiguity between design intent and what the finishing shop actually delivers.
CNC Machining to Anodized Finish: The Full Process Flow
Getting from a raw CNC-machined part to a finished, anodized surface involves several distinct steps, each of which affects the final look and performance of the component. Skipping or reordering any of these stages, especially blasting before anodizing, can compromise the finish. The table below breaks down the sequence from machining to sealing.
| Step | Stage | Purpose |
|---|---|---|
| 1 | CNC machining | Shapes the part to final geometry |
| 2 | Bead blasting | Removes tool marks, creates uniform matte texture |
| 3 | Cleaning | Strips residue and prepares surface for anodizing |
| 4 | Type II anodizing | Grows protective oxide layer, adds corrosion resistance |
| 5 | Dyeing | Adds colour (optional) |
| 6 | Sealing | Locks in dye, closes pores for durability |
Industry Applications for Bead Blasting & Sulfuric Anodizing
The combination of bead blasting and Type II sulfuric anodizing shows up across nearly every sector that relies on precision aluminium components, though the priorities shift depending on the industry.
- Aerospace։ Type II anodizing is specified extensively across the CNC in aerospace industry supply chain for corrosion protection on non-structural aluminium brackets, panels, and housings, often paired with bead blasting for a consistent, low-reflectivity finish that reduces glare in cockpit and cabin environments.
- Medical devices։ surfaces used in CNC for medical industry applications benefit from anodizing's biocompatibility and cleanability, with bead blasting providing a uniform, low-snag texture that's easier to sterilise and inspect than an as-machined finish.
- Automotive and motorsport։ anodized, bead-blasted components appear throughout lightweight brackets, housings, and trim parts where corrosion resistance and consistent cosmetic appearance both matter.
- Consumer electronics and enclosures։ this pairing has become close to a default specification for anodized aluminium housings, offering scratch resistance, a premium tactile finish, and colour customisation via dyeing.
- Industrial equipment։ bead-blasted, anodized components are widely used for control panels, fixtures, and housings exposed to handling and repeated cleaning cycles.
Bead Blasting vs Anodizing vs Both: Which Finish Should You Choose?
Not every part needs the full bead blast and anodize combination, sometimes one treatment alone is enough, depending on the part's function and appearance requirements. The table below compares the three most common finishing paths to help you decide which one fits your application.
| Finish | Best For | Appearance | Corrosion Resistance | Notes |
|---|---|---|---|---|
| Bead blasting only | Parts needing a clean look without added protection | Matte, satin | Low–moderate (aluminium untreated) | No colour options; softer surface |
| Type II anodizing only | Parts machined with good surface finish already | Can be glossy or slightly textured | High | Tool marks may still show through |
| Bead blasting + Type II anodizing | Consumer-facing enclosures, brackets, housings | Uniform matte/satin, even colour | High | Most common combo; masks tool marks before oxide growth |
Specifying Finishes on Your CNC Drawings
Ambiguous finishing callouts are one of the most common causes of delay and rework between design intent and delivered parts. To avoid back-and-forth with your manufacturing partner, drawing notes should specify media type and grade, target surface roughness, and any masking requirements rather than relying on vague terms like "bead blast finish."
A well-specified callout might read: "Bead blast all surfaces with fine-grade glass bead prior to Type II sulfuric anodize per MIL-A-8625, colour black, mask threaded holes and datum surface A." Avoid specifying surface roughness tighter than roughly 0.8 µm Ra for blasted-and-anodized surfaces, since the blasting process itself inherently limits how smooth the final surface can be , pushing for tighter values usually means masking those areas out entirely rather than blasting and hoping to hit the number.
FAQs
Does bead blasting affect the dimensional tolerance of a CNC part?
Can Type II sulfuric anodizing be applied to any aluminium alloy?
Why does my anodized part look patchy or inconsistent in colour?
Is bead blasting necessary before anodizing, or can parts be anodized straight from the machine?
What's the difference between glass bead blasting and vapour honing?
How much does Type II anodizing add to the cost of a CNC machined part compared to bead blasting alone?
About the author
Sam Al-Mukhtar
Mechanical Engineer, Founder and CEO of Geomiq
Mechanical Engineer, Founder and CEO of Geomiq, an online manufacturing platform for CNC Machining, 3D Printing, Injection Moulding and Sheet Metal fabrication. Our mission is to automate custom manufacturing, to deliver industry-leading service levels that enable engineers to innovate faster.